2011-03-24

第六堂課

一開始,先去老師的部落格

程式設計工藝大師(Master of Computer Programming)

尋找程式碼↓


儲存後並執行,會出現一個沒有功能的button↓


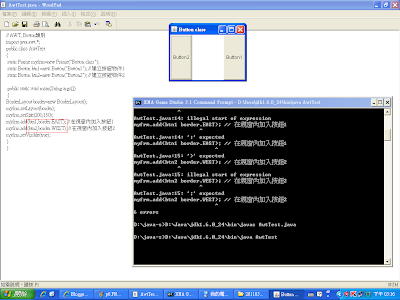
加上兩個button↓


要設定按鈕的方向按鈕才不會重疊↓

myfrm.add(btn1,border.EAST);
 myfrm.add(btn2,border.WEST);

按鈕的BorderLayout可以參考

Java 2 Platform SE v1.3.1: Class BorderLayout 


接下來我們要加入一個文字方塊↓

 static TextField tbx1=new TextField("TestField 1");
myfrm.add(tbx1,border.CENTER);

文字方塊的加入方法可參考

TextField (Java 2 Platform SE v1.4.2)


接下來,我們要慢慢的讓按鈕有功能囉!

加入
import java.awt.event.*;套件
因為要實行public void actionPerformed(ActionEvent e) //加在最後↓


然後試著加入
static AwtTest  myfrm=new AwtTest ("Button class");
還有
AwtTest  myfrm=new AwtTest();


最後發現,使用AwtTest myfrm=new AwtTest() 才是可行的

static AwtTest myfrm=new AwtTest ("Button class");則會出現錯誤

成功加入了新的frame

可是我們要讓button可以聽到命令
所以還必須加入btn1.addActionListener(myfrm);


最後,在public void actionPerformed(ActionEvent e) { }裡輸入
int rn;
rn=(int) (Math.random()*49) ; 
System.out.println(rn );


結果跑出來之後,按一下button1(因為我們只讓這個鍵有功能),就可以跑出隨機亂數囉~
如下↓


今天的作業呢!就是要像大樂透一樣,按一下,登登!!
就可以出現7個不同的數字在文字方塊裡

首先呢!Layout的方法不能再使用BorderLayout了,
因為BorderLayout只有五個方位,不管你再怎麼用也只有5個方位,
7個文字方塊怎麼擠的下,所以我們要使用的Layout方法是FlowLayout呦!!

最後,終於給我亂try try 出來了,雖然程式碼「樂樂ㄉㄥˊ」
不過總算是完成作業囉XD

請參考以下程式碼(不一定對,但勉強可參考^^)

// AWT, Button類別
import java.awt.*;
import java.awt.event.*;
public class AwtTest  extends Frame implements ActionListener 
{
// static Frame myfrm=new Frame("Button class");
//static AwtTest  myfrm=new AwtTest ("Button class");
static Button btn1=new Button("Button1"); // 建立按鈕物件1
//static Button btn2=new Button("Button2"); // 建立按鈕物件2

static TextField tbx1=new TextField("1"); // 建立文字方塊1
static TextField tbx2=new TextField(" 2"); // 建立文字方塊2
static TextField tbx3=new TextField("3"); // 建立文字方塊3
static TextField tbx4=new TextField(" 4"); // 建立文字方塊4
static TextField tbx5=new TextField(" 5"); // 建立文字方塊5
static TextField tbx6=new TextField(" 6"); // 建立文字方塊6
static TextField tbx7=new TextField(" 7"); // 建立文字方塊7
public static void main(String args[])
 {
AwtTest  myfrm=new AwtTest();
//BorderLayout border=new BorderLayout();
FlowLayout flow=new FlowLayout();
myfrm.setLayout(flow);
myfrm.setSize(200,150);
btn1.addActionListener(myfrm);

myfrm.add(btn1); // 在視窗內加入按鈕1
//myfrm.add(btn2,border.WEST); // 在視窗內加入按鈕2
myfrm.add(tbx1); // 在視窗內加入文字方塊1
myfrm.add(tbx2); // 在視窗內加入文字方塊2
myfrm.add(tbx3); // 在視窗內加入文字方塊3
myfrm.add(tbx4); // 在視窗內加入文字方塊4
myfrm.add(tbx5); // 在視窗內加入文字方塊5
myfrm.add(tbx6); // 在視窗內加入文字方塊6
myfrm.add(tbx7); // 在視窗內加入文字方塊7
myfrm.setVisible(true);     
}


public void actionPerformed(ActionEvent e) 
int rn1,rn2,rn3,rn4,rn5,rn6,rn7;
rn1=(int) (Math.random()*49) ; 
rn2=(int) (Math.random()*49) ; 
rn3=(int) (Math.random()*49) ; 
rn4=(int) (Math.random()*49) ; 
rn5=(int) (Math.random()*49) ; 
rn6=(int) (Math.random()*49) ; 
rn7=(int) (Math.random()*49) ; 

String stringValue1=Integer.toString(rn1);
String stringValue2=Integer.toString(rn2);
String stringValue3=Integer.toString(rn3);
String stringValue4=Integer.toString(rn4);
String stringValue5=Integer.toString(rn5);
String stringValue6=Integer.toString(rn6);
String stringValue7=Integer.toString(rn7);

System.out.println(rn1);
System.out.println(rn2);
System.out.println(rn3);
System.out.println(rn4);
System.out.println(rn5);
System.out.println(rn6);
System.out.println(rn7);

tbx1.setText(stringValue1 );
tbx2.setText(stringValue2);
tbx3.setText(stringValue3 );
tbx4.setText(stringValue4 );
tbx5.setText(stringValue5 );
tbx6.setText(stringValue6 );
tbx7.setText(stringValue7 );
}

}


喔!忘了說,出來的數字還是可能有重複喔!

2011-03-18

第五堂課

今天一開始,先從老師的部落格

程式設計工藝大師(Master of Computer Programming)    

複製程式碼↓


儲存成java檔之後,轉成class檔
執行,就會跑出一個沒有功能的button↓


可以下載這個檔案

另存並執行,會出現下列的圖↓


修改第一個儲存的程式碼
如果要使用Jbutton記得要加上 import javax.swing.*; 套件

在public class ButtonText後加上extends JFrame implements ActionListener 

並在public static void main(String[] args) 後的{  }裡打上
ButtonText test = new ButtonText();  

在ButtonText(){  }裡面打
JButton mybutton1 = new JButton("Submit"); 
JButton mybutton2 = new JButton("Submit"); 

mybutton1.addActionListener(this); 

getContentPane().add(mybutton1); 
 getContentPane().add(mybutton2); 


setDefaultCloseOperation(JFrame.EXIT_ON_CLOSE);  
setLayout(new FlowLayout());
setSize(200,100);
setVisible(true);

在最後面的地方加上
public void actionPerformed(ActionEvent e) {
int rn ;   //rn是random的意思
rn=(int)(Math.random()*49);
Systme.out.println(rn);
}


就可以產生出一個0~48之內的隨機整數↓


今天的作業呢!就是創造出一個跟樂透一樣,
可以按一個鍵就一次跑出七個數字的程式碼呦!


參考     大小樂透use Math.random - Java作業- Yahoo!奇摩部落格


作業的程式碼


import java.awt.*; 
import java.awt.event.*;
import javax.swing.*;
public class ButtonText extends JFrame implements ActionListener  { 
 public static void main(String[] args) {
ButtonText test = new ButtonText();    
  }

ButtonText()
{
    
JButton mybutton1 = new JButton("Submit"); 
JButton mybutton2 = new JButton("Submit"); 

mybutton1.addActionListener(this); 
//Container contentPane = frame.getContentPane();

//contentPane.add(mybutton1);  
//contentPane.add(mybutton2);  
 getContentPane().add(mybutton1); 
 getContentPane().add(mybutton2); 

setDefaultCloseOperation(JFrame.EXIT_ON_CLOSE);  
setLayout(new FlowLayout());
setSize(200,100);
setVisible(true);
/* 

        System.exit(0);

 frame.addWindowListener(new WindowAdapter(){
      public void windowClosing(WindowEvent e){
*/
}
public void actionPerformed(ActionEvent e) { 
int rn1,rn2,rn3,rn4,rn5,rn6,rn7;
rn1=(int)(Math.random()*49)+1;    //記得要加1喔
rn2=(int)(Math.random()*49)+1;
rn3=(int)(Math.random()*49)+1;
rn4=(int)(Math.random()*49)+1;
rn5=(int)(Math.random()*49)+1;
rn6=(int)(Math.random()*49)+1;
rn7=(int)(Math.random()*49)+1;

System.out.println(rn1);
System.out.println(rn2);
System.out.println(rn3);
System.out.println(rn4);
System.out.println(rn5);
System.out.println(rn6);
System.out.println(rn7);

}

}


結果↓


2011-03-17

第四堂課

其實在很多的應用程式當中都可以建造button,例如excel、VB、......等。

↓excel  建造button


所以今天的主題就是要利用java建造出一個button


下載程式碼↓


可以發現
public void actionPerformed(ActionEvent e)
 {  SizeW = SizeW *2;  
   SizeH = SizeH *2;    
           setSize(SizeW,SizeH);  }  

其中的
 SizeW = SizeW *2;  
SizeH = SizeH *2; 
指的就是,顯現出來的button會變成兩倍大
按一次就變大兩倍,再按一次又變大兩倍
以此類推XD

如果我們要把它改成每按一次就縮小一倍的話
就要變成
public void actionPerformed(ActionEvent e) 
{   SizeW =(int) (SizeW * 0.5);  
  SizeH = (int)(SizeH * 0.5);    
setSize(SizeW,SizeH); }  

就要在 SizeW和SizeH之前加個(int)強制他變成整數
因為先前有設
int SizeW =210;  
int SizeH = 210; 

如下圖↓


如果有成功,就會如下圖,跑出一個frame↓


接著,再從 How to Create Button on Frame  參考一些程式碼


許多程式要執行必須在開頭就import套件
套件通常都在 src.zip裡面
如果不知道自己使用的套件在哪,可以進資料夾找找↓


套件↓


這就是最後的結果囉!
這可以順利的產生一個button↓


這一次的作業,是建立一個有button還有一個checkbox的frame

這是中間的部分

     public static void main(String[] args)
 {  
          // Work2 test = new Work2();  
  
Frame frame=new Frame("Button Frame");  
frame.setSize(210,210);
  frame.setVisible(true);

JButton mybutton = new JButton("mybutton");  
mybutton.setSize(100,100);
frame.add(mybutton);

Checkbox mycheckbox= new Checkbox ("checkbox");  
mycheckbox.setSize(120,120);
frame.add(mycheckbox);

frame.addWindowListener(new WindowAdapter(){
      public void windowClosing(WindowEvent e){
        System.exit(0);
}
    });
       }  


2011-03-03

第三堂課


從這裡可以知道電腦上的JAVA可否正常執行


路徑裡不可以有空白Program(空白) File
這樣不能執行


當出現return type required
就打viod不用回應
main代表  主要的方法  後面要加一個()


當字串都打對的時候
檔案就可編輯也可執行了


由此可知,不管有沒有打" "雙引號
都可顯示出()裡的數字


args這個參數
args[0]代表第一個數
args[1]代表第二個數
args[2]代表第三個數


args[0]+args[1]顯示出來的數不是相加,而是並排


int  宣告
ex: int x
把字串轉成整數 x=Integer.parseInt(args[0]);


要像上面所示這樣才可以相加
而且不可以寫System.out.println(x,y,z);

要分別寫才可
ex: System.out.println(x);
     System.out.println(y);
    System.out.println(z);


作業
寫出一個矩陣相乘的程式

class Test20110304
{
public static void main(String[]args)
{
int x,y,z,w,v;
x=Integer.parseInt(args[0]);
y=Integer.parseInt(args[1]);
z=Integer.parseInt(args[2]);
w=Integer.parseInt(args[3]);
v=x*z+y*w;
System.out.println(v);
}
}